Windows NVMe Blues
Emboldened with the newly landed VNC support, we decided to give booting Windows in Propolis a go. Unfortunately, it didn't quite work right away.
Provisioning
Creating a Windows VM
The VNC server built-in to Propolis is currently only one-way: it will show you the guest framebuffer but doesn't relay any input from a client (e.g. mouse or keyboard) back to the guest. This poses a challenge when it comes to installing Windows since we kinda need to be able to poke at the installer. But we can make our way around that easily enough by trying to boot an existing image instead. To create such an image is simple enough with QEMU:
# Create an empty disk image to install to
truncate -s 40GiB $WIN_IMAGE

QEMU_ARGS=(
    -nodefaults
    -name guest=wintest,debug-threads=on
    -enable-kvm
    -M pc
    -m 2048
    -cpu host
    -smp 4,sockets=1,cores=4
    -rtc base=localtime
    # OVMF UEFI firmware (See Propolis README)
    -drive if=pflash,format=raw,readonly=on,file=$OVMF_CODE
    # Boot Drive backed by $WIN_IMAGE
    -device nvme,drive=drivec,serial=deadbeef
    -drive if=none,id=drivec,file=$WIN_IMAGE,format=raw
    # Virtio-based NIC
    -netdev tap,ifname=wintestnet,id=net0,script=no,downscript=no
    -device virtio-net-pci,netdev=net0
    # RAMFB Display Device
    -device ramfb
    # Windows Installer ISO (not needed after install)
    -device ide-cd,drive=win-disk,id=cd-disk1,unit=0,bus=ide.0
    -drive file=$WIN_ISO,if=none,id=win-disk,media=cdrom
    # Virtio Drivers ISO - For Virtio NIC support (not needed after install)
    -device ide-cd,drive=virtio-disk,id=cd-disk2,unit=0,bus=ide.1
    -drive file=$VIRTIO_ISO,if=none,id=virtio-disk,media=cdrom
)
qemu-system-x86_64 "${QEMU_ARGS[@]}"
With this we can try to create a VM in QEMU while mostly matching the same virtual hardware as supported by Propolis (e.g., i440FX chipset, NVMe boot drive, VirtIO NIC). A little bit later and we're greeted with a newly installed Windows system.
Serial Console
Windows has a serial console (aka Emergency Management Services) which can print out early boot errors.
Before we shutdown and try booting it in Propolis, let's enable the serial console:
# Admin prompt
PS > bcdedit /ems on
PS > bcdedit /emssettings EMSPORT:1 EMSBAUDRATE:115200
By default, Windows Server SKUs also include the Special Administration Console (SAC) via EMS
which offers an interactive session as well as letting you drop into a CMD prompt over serial. But,
fret not if you don't have a Windows Server image handy, we can easily enable it for Desktop SKUs too:
# Admin prompt
PS > Add-WindowsCapability -Online -Name Windows.Desktop.EMS-SAC.Tools~~~~0.0.1.0
We need to reboot to complete the installation but that'll give us an opportunity to see the console.
To do that we'll need to slightly modify the QEMU command line by adding an extra flag: -serial stdio.
With that, on next boot we should see something like:
BdsDxe: loading Boot0007 "Windows Boot Manager" from HD(1,GPT,78455C93-77D8-4B62-8D6E-588FB0E91060,0x800,0x32000)/\EFI\Microsoft\Boot\bootmgfw.efi
BdsDxe: starting Boot0007 "Windows Boot Manager" from HD(1,GPT,78455C93-77D8-4B62-8D6E-588FB0E91060,0x800,0x32000)/\EFI\Microsoft\Boot\bootmgfw.efi

<?xml version="1.0"?>
<machine-info>
<name>WINTEST</name>
<guid>00000000-0000-0000-0000-000000000000</guid>
<processor-architecture>AMD64</processor-architecture>
<os-version>10.0</os-version>
<os-build-number>19041</os-build-number>
<os-product>Windows 10</os-product>
<os-service-pack>None</os-service-pack>
</machine-info>

Computer is booting, SAC started and initialized.

Use the "ch -?" command for information about using channels.
Use the "?" command for general help.


SAC>
EVENT: The CMD command is now available.
SAC>
Remote Access
For some more fun, let's also enable RDP and SSH which will give us more options to interact with the VM:
# Admin prompt

# Enable RDP
PS > Set-ItemProperty "HKLM:\SYSTEM\CurrentControlSet\Control\Terminal Server\" -Name "fDenyTSConnections" -Value 0

# Install SSH Server and make it autostart
PS > Add-WindowsCapability -Online -Name OpenSSH.Server~~~~0.0.1.0
PS > Start-Service sshd
PS > Set-Service -Name sshd -StartupType Automatic
(As an aside, so glad Windows includes SSH nowadays. The ssh.exe client is enabled by default too!)
Booting atop Propolis
Ok, so we've created our Windows VM image, setup the serial console and even enabled SSH & RDP. But all that is for naught if we don't tell Propolis about it.
Propolis Setup
Since the VNC support in Propolis is only exposed in the propolis-server frontend, that's what
we'll use. First off, we'll just create the TOML describing the VM. We hardcode all the devices
we want rather than creating them via REST API calls.
After substituting the paths to the OVMF blob and the windows image we created, we're ready to rumble:
# windows.toml

bootrom = "/path/to/$OVMF_CODE"

[block_dev.c_drive]
type = "file"
path = "$WIN_IMAGE"

[dev.block0]
driver = "pci-nvme"
block_dev = "c_drive"
pci-path = "0.5.0"

[dev.net0]
driver = "pci-virtio-viona"
vnic = "vnic0"
pci-path = "0.6.0"
Let's also create the host-side of the vNIC the VM will bind to:
$ dladm create-vnic -t -l $(dladm show-phys -p -o LINK) vnic0
This creates a new virtual NIC atop the existing physical link so the guest will appear as just another device on the LAN. This also means it should acquire an IP address via DHCP if that's setup for the network.
Setup
To get everything up and running, we're going to need a couple of terminals.
First, we need to start propolis-server which exposes a REST API for creating and managing VMs:
$ sudo cargo run --bin propolis-server -- run windows.toml 0.0.0.0:12400
(We need sudo/pfexec because illumos does not have a
privilege to allow access to hypervisor resources currently.)
Leaving propolis running, we now need to tell it to actually create the VM instance via the REST API which we can do with our command line tool:
# Create a 4 core VM w/ 2GiB of RAM
$ cargo run --bin propolis-cli -- -s 127.0.0.1 new -c 4 -m 2048 wintest
Looking back at the propolis-server terminal, we should see it having successfully created the VM.
But it is currently in a stopped state so before we tell it to run, let's attach our serial console
and VNC client.
The serial console is served by propolis-server over a WebSocket but the propolis-cli tool
makes it simple to access and interact with:
$ cargo run --bin propolis-cli -- -s 127.0.0.1 serial
(Note: Ctrl-C will exit the serial console. To pass it along to the guest instead, we first prefix it with Ctrl-A.)
We can use a VNC client like (noVNC or vncviewer) by pointing it to the VNC server which is
listening on port 5900.
Running
With that, all our ducks have been lined up. Let's tell Propolis to run the VM!
$ cargo run --bin propolis-cli -- -s 127.0.0.1 state run
Things start off kinda well! We're greeted with the serial console actually outputting stuff:
BdsDxe: loading Boot0007 "Windows Boot Manager" from HD(1,GPT,78455C93-77D8-4B62-8D6E-588FB0E91060,0x800,0x32000)/\EFI\Microsoft\Boot\bootmgfw.efi
BdsDxe: starting Boot0007 "Windows Boot Manager" from HD(1,GPT,78455C93-77D8-4B62-8D6E-588FB0E91060,0x800,0x32000)/\EFI\Microsoft\Boot\bootmgfw.efi
<?xml version="1.0"?>
<machine-info>
<name>WINTEST</name>
<guid>00000000-0000-0000-0000-000000000000</guid>
<processor-architecture>AMD64</processor-architecture>
<os-version>10.0</os-version>
<os-build-number>19041</os-build-number>
<os-product>Windows 10</os-product>
<os-service-pack>None</os-service-pack>
</machine-info>
Computer is booting, SAC started and initialized.

Use the "ch -?" command for information about using channels.
Use the "?" command for general help.

SAC>
We even sorta see the little windows boot animation over VNC:

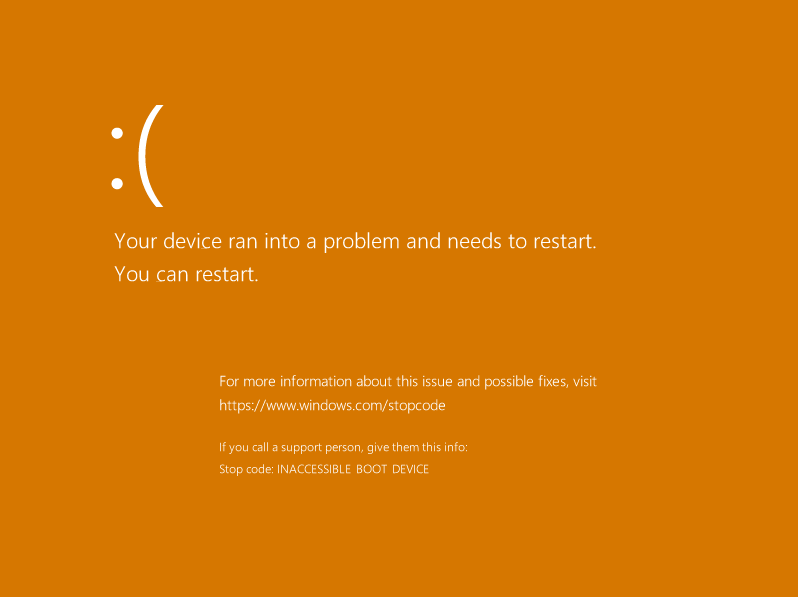
But soon enough we run into a “bluescreen”:
<?xml><BP>
<INSTANCE CLASSNAME="BLUESCREEN">
<PROPERTY NAME="STOPCODE" TYPE="string"><VALUE>"0x7B"</VALUE></PROPERTY><machine-info>
<name>WINTEST</name>
<guid>00000000-0000-0000-0000-000000000000</guid>
<processor-architecture>AMD64</processor-architecture>
<os-version>10.0</os-version>
<os-build-number>19041</os-build-number>
<os-product>Windows 10</os-product>
<os-service-pack>None</os-service-pack>
</machine-info>
</INSTANCE>
</BP>

!SAC>
Your device ran into a problem and needs to restart.
If you call a support person, give them this info:
INACCESSIBLE_BOOT_DEVICE


0xFFFFCE0B72206868
0xFFFFFFFFC0000034
0x0000000000000000
0x0000000000000001

!SAC>?
d        Display all log entries, paging is on.
help     Display this list.
restart  Restart the system immediately.
?        Display this list.

!SAC>d
20:06:49.065 : KRNL: Loading \Driver\Wdf01000.
20:06:49.065 : KRNL: Load succeeded.
20:06:49.065 : KRNL: Loading \Driver\acpiex
20:06:49.065 : KRNL: Load succeeded.
[...snip...]
20:07:23.252 : KRNL: Loading \Driver\hwpolicy
20:07:23.252 : KRNL: Load failed.
20:07:23.252 : KRNL: Loading \Driver\disk
20:07:23.252 : KRNL: Load succeeded.
20:07:53.846 : KRNL: Failed marking boot partition.
Well, what now? For whatever reason, Windows is unable to access the boot disk. Definitely makes you go "wait a second" as it had to have recognized the disk enough to find the boot loader and make it this far. But at least this tells us we're failing in Windows proper and not much earlier like the boot manager or OS loader.
EDIT: We see an orange screen instead of blue because the VNC client and server do not agree
on the pixel format. The client side thinks the framebuffer is encoded as XBGR8888 whereas the
server side is actually sending pixel values encoded as XRGB8888i.e., the red and blue components
are getting swapped.
EDIT (July 7, 2022): The Orange Screen of Death is no more! Thanks to some work from my colleague to better handle multiple pixel formats [PR].
Debugging
Bluescreen
So what are bluescreens anyways? That is the screen displayed by Windows when it encounters some sort of unrecoverable error. Such a crash, aka bug check, can occur due to hardware or software issues.
Notwithstanding any bugs in rendering, the bugcheck screen is not always blue! If you encounter a bugcheck, for example, on a Windows Insider build, you'll be greeted by a Green Screen of Death!
If you wanna have some fun, you can change it by modifying %SystemRoot%\SYSTEM.INI.
EDIT: Ok, that's not really true anymore for modern versions of Windows. But of course Raymond Chen's blog The Old New Thing has a post on exactly this.
Bug Check Code 7B
Back to our crash at hand. Both the serial console and VNC give us a stop code of INACCESSIBLE_BOOT_DEVICE.
Microsoft does provide a list of bug checks and possible causes and resolution. We can find the relevant
one here.
Well the possible causes sure are vague. Clearly, something changed about our virtual hardware platform between Propolis and QEMU that Windows is not happy with. Unfortunately, there isn't much else to go on.
Every bug check may also include some parameters with more details about the crash. That is the four hex values that were printed to the serial console. The Microsoft docs though only tell us what parameter 1 may be:
The address of a
UNICODE_STRINGstructure, or the address of the device object that could not be mounted.
To make sense of that we'll have to break out the kernel debugger!
Debug Setup
The basic setup here is connecting the target Windows machine (Propolis VM) to another Windows machine (the debugger) in some way supported by the Windows Kernel Debugger. For that, there are a couple of options:
- kdnet — the recommended (and fastest option) but you need a NIC that supports it (VirtIO does not).
- kdusb — requires special USB debug cables—not to mention the complete lack of USB support in Propolis.
- kdcom — over a serial port. A classic.
Propolis basically constrains us to option (3): debugging over serial. To do that, we're going to switch
from propolis-server to propolis-standalone because it conveniently pipes the first serial port to
a unix domain socket. We can connect that to a different Windows machine that will act as the debugger.
Debugger
Since our serial is virtual anyways and I also don't have a bare metal machine with a serial port,
the debugger will just be another VM in QEMU. The setup is similar to above except we make sure to
include the argument -serial tcp::9999,server,nowait. This tells QEMU to listen on port 9999
(arbitrary) and once a connection is made, to proxy the virtual serial port over a TCP socket.
WinDbg
Inside the debugger VM, we need to install the debugging components needed. I've found WinDbg Preview to work well enough for me but Classic WinDbg still lives on (they both use the same underlying debugger engine).
Once installed, we start debugging by choosing "Attach to kernel" using COM1 as the port and a baud
rate of 115200. Also enable "Break on connection"/"Initial Break". With that, the debugger side is ready.
You can leave it running throughout and restart the debuggee as needed.
Debuggee
Our Propolis VM will be the debugging target but we first need to pop back over to QEMU so we can tell Windows to connect to the debugger on boot.
Since we're going to be using the serial port for debugging, let's disable the serial console:
# Admin prompt
PS > bcdedit /ems off
Then we can enable debugging over the serial port instead, matching the baudrate we chose on the debugger side:
# Admin prompt
PS > bcdedit /debug on
PS > bcdedit /dbgsettings serial debugport:1 baudrate:115200
Before trying it out in Propolis, we can make sure we setup it up right with QEMU. Just replace
any -serial argument with -serial tcp:host-or-ip-of-debugger-vm:9999. This will have QEMU
initiate a TCP connection to the debugger VM and proxy its serial port over it. In this way,
we should have both VMs hooked up together and should see signs of life in WinDbg shortly afterwards:
Microsoft (R) Windows Debugger Version 10.0.22549.1000 AMD64
Copyright (c) Microsoft Corporation. All rights reserved.

Opened \\.\com1
Waiting to reconnect...
Connected to Windows 10 19041 x64 target at (Sun May  1 07:32:44.449 2022 (UTC - 7:00)), ptr64 TRUE
Kernel Debugger connection established.  (Initial Breakpoint requested)

************* Path validation summary **************
Response                         Time (ms)     Location
Deferred                                       srv*
Symbol search path is: srv*
Executable search path is:
Windows 10 Kernel Version 19041 MP (1 procs) Free x64
Edition build lab: 19041.1.amd64fre.vb_release.191206-1406
Machine Name:
Kernel base = 0xfffff800`14601000 PsLoadedModuleList = 0xfffff800`1522b3b0
System Uptime: 0 days 0:00:00.000
nt!DebugService2+0x5:
fffff800`149fe105 cc              int     3
Debugging Propolis VM
Ok, our Windows image is setup for kernel debugging, now to try launching it under Propolis.
As mentioned, we're going to switch over to propolis-standalone so we can get at the serial
port via a unix socket. For that, we're gonna need a slightly different windows.toml:
[main]
name = "wintest"
cpus = 4
memory = 2048
bootrom = "/path/to/$OVMF_CODE"

[block_dev.c_drive]
type = "file"
path = "$WIN_IMAGE"

[dev.block0]
driver = "pci-nvme"
block_dev = "c_drive"
pci-path = "0.5.0"

[dev.net0]
driver = "pci-virtio-viona"
vnic = "vnic0"
pci-path = "0.6.0"
This is basically the same as our earlier TOML with the addition of the first 4 lines where
we've hardcoded the name, vCPU count and memory instead of providing it via a REST API. With
that we can run Propolis and we should see it paused waiting for a connection to the serial
port (a unix socket created in the same directory named ttya):
$ sudo cargo run --release --bin propolis-standalone -- windows.toml
May 01 14:40:12.968 INFO VM created, name: wintest
- 1: lpc-bhyve-atpic
- 2: lpc-bhyve-atpit
- 3: lpc-bhyve-hpet
- 4: lpc-bhyve-ioapic
- 5: lpc-bhyve-rtc
- 6: chipset-i440fx
  - 7: pci-piix4-hb
  - 8: pci-piix3-lpc
  - 9: pci-piix3-pm
  - 10: lpc-bhyve-pmtimer
- 11: lpc-uart-com1
- 12: lpc-uart-com2
- 13: lpc-uart-com3
- 14: lpc-uart-com4
- 15: lpc-ps2ctrl
- 16: qemu-lpc-debug
- 17: pci-nvme-0.5.0
  - 18: block-file-/home/luqman/VMs/IMGs/windows.img
- 19: pci-virtio-viona-0.6.0
- 20: qemu-fwcfg
- 21: qemu-ramfb
May 01 14:40:12.997 ERRO Waiting for a connection to ttya
We'll use socat to proxy the unix socket attached to Propolis' serial port to our debugger VM:
$ sudo socat UNIX-CONNECT:./ttya TCP-CONNECT:host-or-ip-of-debugger-vm:9999
sudo here is needed since ttya was created by propolis-standalone which we also ran with sudo.
(Ideally, it'd be nice to have propolis just learn how to make a direct connection rather than
needing socat. But also, I love socat! It's one of my favourite tools.)
With that, we should be in business and kernel debugging a Windows guest running in Propolis!
Investigating
We now have a kernel debugger, but where to begin? Well, why not see if we still hit the same bug check
when running under the debugger. The debugger should be waiting for input so just type g (Go) to let the
target continue running. We did request an initial break so it may stop again early in kernel initialization,
so just hit g again.
It is at this point we remember how slow kernel debugging makes things, not to mention over emulated serial and a VM at that.
Bug Check
Huzzah! We hit the same error (believe me, it'd be worse if worked under the debugger!)
kd> g
IOINIT: Built-in driver \Driver\sacdrv failed to initialize with status - 0xC0000037
We are running at normal mode.
KDTARGET: Refreshing KD connection

*** Fatal System Error: 0x0000007b
                       (0xFFFFF68C42606868,0xFFFFFFFFC0000034,0x0000000000000000,0x0000000000000001)

Break instruction exception - code 80000003 (first chance)

A fatal system error has occurred.
Debugger entered on first try; Bugcheck callbacks have not been invoked.

A fatal system error has occurred.

For analysis of this file, run !analyze -v
nt!DbgBreakPointWithStatus:
fffff803`27a040b0 cc              int     3
The first line about sacdrv failing to initialize is innocuous. That's just because
we disabled the EMS console but left the SAC components installed.
Other than that we've got a lot of the same info we saw before, but it does give us a
command to run: !analyze -v. (WinDbg Preview even helpfully lets you just click on it)
!analyze -v
kd> !analyze -v
Connected to Windows 10 19041 x64 target at (Sun May  1 07:59:23.729 2022 (UTC - 7:00)), ptr64 TRUE
Loading Kernel Symbols
.........

Press ctrl-c (cdb, kd, ntsd) or ctrl-break (windbg) to abort symbol loads that take too long.
Run !sym noisy before .reload to track down problems loading symbols.

......................................................
................................................................
....
Loading User Symbols

Loading unloaded module list
...
*******************************************************************************
*                                                                             *
*                        Bugcheck Analysis                                    *
*                                                                             *
*******************************************************************************

INACCESSIBLE_BOOT_DEVICE (7b)
During the initialization of the I/O system, it is possible that the driver
for the boot device failed to initialize the device that the system is
attempting to boot from, or it is possible for the file system that is
supposed to read that device to either fail its initialization or to simply
not recognize the data on the boot device as a file system structure that
it recognizes.  In the former case, the argument (#1) is the address of a
Unicode string data structure that is the ARC name of the device from which
the boot was being attempted.  In the latter case, the argument (#1) is the
address of the device object that could not be mounted.
If this is the initial setup of the system, then this error can occur if
the system was installed on an unsupported disk or SCSI controller.  Note
that some controllers are supported only by drivers which are in the Windows
Driver Library (WDL) which requires the user to do a custom install.  See
the Windows Driver Library for more information.
This error can also be caused by the installation of a new SCSI adapter or
disk controller or repartitioning the disk with the system partition.  If
this is the case, on x86 systems the boot.ini file must be edited or on ARC
systems setup must be run.  See the "Advanced Server System Administrator's
User Guide" for information on changing boot.ini.
If the argument is a pointer to an ARC name string, then the format of the
first two (and in this case only) longwords will be:
    USHORT Length;
    USHORT MaximumLength;
    PWSTR Buffer;
That is, the first longword will contain something like 00800020 where 20
is the actual length of the Unicode string, and the next longword will
contain the address of buffer.  This address will be in system space, so
the high order bit will be set.
If the argument is a pointer to a device object, then the format of the first
word will be:
    USHORT Type;
That is, the first word will contain a 0003, where the Type code will ALWAYS
be 0003.
Note that this makes it immediately obvious whether the argument is a pointer
to an ARC name string or a device object, since a Unicode string can never
have an odd number of bytes, and a device object will always have a Type
code of 3.
Arguments:
Arg1: fffff68c42606868, Pointer to the device object or Unicode string of ARC name
Arg2: ffffffffc0000034, (reserved)
Arg3: 0000000000000000, (reserved)
Arg4: 0000000000000001, (reserved)

Debugging Details:
------------------

KEY_VALUES_STRING: 1
    Key  : Analysis.CPU.mSec
    Value: 1937
    Key  : Analysis.DebugAnalysisManager
    Value: Create
    Key  : Analysis.Elapsed.mSec
    Value: 6825
    Key  : Analysis.Init.CPU.mSec
    Value: 5905
    Key  : Analysis.Init.Elapsed.mSec
    Value: 1713912
    Key  : Analysis.Memory.CommitPeak.Mb
    Value: 110
    Key  : WER.OS.Branch
    Value: vb_release
    Key  : WER.OS.Timestamp
    Value: 2019-12-06T14:06:00Z
    Key  : WER.OS.Version
    Value: 10.0.19041.1

BUGCHECK_CODE:  7b
BUGCHECK_P1: fffff68c42606868
BUGCHECK_P2: ffffffffc0000034
BUGCHECK_P3: 0
BUGCHECK_P4: 1

PROCESS_NAME:  System

STACK_TEXT:
fffff68c`42606078 fffff803`27b18882     : fffff68c`426061e0 fffff803`27983940 00000000`00000000 00000000`00000000 : nt!DbgBreakPointWithStatus
fffff68c`42606080 fffff803`27b17e66     : 00000000`00000003 fffff68c`426061e0 fffff803`27a110c0 00000000`0000007b : nt!KiBugCheckDebugBreak+0x12
fffff68c`426060e0 fffff803`279fc317     : fffff803`261dccd0 fffff803`27beef3e ffffffff`c0000034 00000000`000000c8 : nt!KeBugCheck2+0x946
fffff68c`426067f0 fffff803`27aabe0e     : 00000000`0000007b fffff68c`42606868 ffffffff`c0000034 00000000`00000000 : nt!KeBugCheckEx+0x107
fffff68c`42606830 fffff803`2805b69d     : ffffe08b`e44a09c0 fffff803`261dccd0 ffffffff`8000036c 00000000`00000001 : nt!PnpBootDeviceWait+0xf1eca
fffff68c`426068c0 fffff803`28042c20     : fffff803`00000000 fffff803`2824c700 00000000`00000006 fffff803`261dccd0 : nt!IopInitializeBootDrivers+0x511
fffff68c`42606a70 fffff803`28067abd     : fffff803`2ba6cfc0 fffff803`261dccd0 fffff803`27d9b6a0 fffff803`261dcc00 : nt!IoInitSystemPreDrivers+0xb24
fffff68c`42606bb0 fffff803`27d9b6db     : fffff803`261dccd0 fffff803`2824e068 fffff803`27d9b6a0 fffff803`261dccd0 : nt!IoInitSystem+0x15
fffff68c`42606be0 fffff803`278a99a5     : ffffca03`daca95c0 fffff803`27d9b6a0 fffff803`261dccd0 00000000`00000000 : nt!Phase1Initialization+0x3b
fffff68c`42606c10 fffff803`27a03868     : fffff803`2654f180 ffffca03`daca95c0 fffff803`278a9950 00000000`00000000 : nt!PspSystemThreadStartup+0x55
fffff68c`42606c60 00000000`00000000     : fffff68c`42607000 fffff68c`42601000 00000000`00000000 00000000`00000000 : nt!KiStartSystemThread+0x28

SYMBOL_NAME:  nt!PnpBootDeviceWait+f1eca
MODULE_NAME: nt
IMAGE_NAME:  ntkrnlmp.exe
IMAGE_VERSION:  10.0.19041.630
STACK_COMMAND:  .cxr; .ecxr ; kb
BUCKET_ID_FUNC_OFFSET:  f1eca
FAILURE_BUCKET_ID:  0x7B_nt!PnpBootDeviceWait
OS_VERSION:  10.0.19041.1
BUILDLAB_STR:  vb_release
OSPLATFORM_TYPE:  x64
OSNAME:  Windows 10
FAILURE_ID_HASH:  {135d3c47-59ae-2dc5-ff32-063555fd22bf}
Followup:     MachineOwner
---------
Well, that dumped a whole lotta info but no smoking gun exactly 😅 But we press on.
Let's check out parameter 1 of our bug check, which remember will either be a device object
or some string. If it is a string, it won't be your standard nul-terminated string but rather
something of the type UNICODE_STRING which is a length-delimited string. We can use the
dt (Display Type) command to see what it looks like:
kd> dt _UNICODE_STRING
nt!_UNICODE_STRING
   +0x000 Length           : Uint2B
   +0x002 MaximumLength    : Uint2B
   +0x008 Buffer           : Ptr64 Wchar
Note: We gave dt an underscore-prefixed type name here because most Windows types are declared
such that the struct name has an underscore and there's a typedef without, e.g.:
typedef struct _FOO { /* fields */ } FOO, *PFOO;
Looking at parameter 1 we see what does appear to be a valid string!
kd> dS fffff68c42606868
ffffe08b`e45a1ae0  "\ArcName\multi(0)disk(0)rdisk(0)"
ffffe08b`e45a1b20  "partition(3)"
Ok, cool. But doesn't really help us. It's not like we need to identify which disk is failing. There's only but the one 😛 So what now?
EDIT: If you're curious what ArcName is or the details of this path format, the really
old Microsoft Knowledge Base Article
Q102873: BOOT.INI and ARC Path Naming Conventions and Usage
(very kindly archived by @jeffpar) has a fantastic explanation.
Tracing
When confronted with a problem in a new area I like to get all the information I possibly can. 99% of it might be useless but I don't know enough to know that just yet. To that end, tracing can be really helpful to get the lay of the land.
In our case here, one place to start is any kernel and driver traces we can find. Kernel drivers
on Windows often use DbgPrint.
We're going to try to tease out as much of those as we can. But first, we let's restart the VM
to go back before the bug check.
Once we're back in the debugger at the beginning again we can begin messing around. First step is
enabling the global default mask for debug prints using the ed (Enter Value [Double Word]) command:
kd> ed nt!Kd_DEFAULT_Mask 0xFFFFFFFF
But we can also enable specific components which we can find like so:
kd> x nt!Kd_*_Mask
This will print a big ol list of which we select some relevant looking ones to start with:
kd> ed nt!Kd_PNPMGR_Mask 0xFFFFFFFF
kd> ed nt!Kd_PCI_Mask 0xFFFFFFFF
kd> ed nt!Kd_STORMINIPORT_Mask 0xFFFFFFFF
kd> ed nt!Kd_STORPORT_Mask 0xFFFFFFFF
Already, this provides some gems:
Intel Storage Driver Ver: 8.6.2.1019

totally need 0x6438 bytes for deviceExt memory
totally need 0x6438 bytes for deviceExt memory
totally need 0x6438 bytes for deviceExt memory
totally need 0x6438 bytes for deviceExt memory
totally need 0x6438 bytes for deviceExt memory
totally need 0x6438 bytes for deviceExt memory
totally need 0x6438 bytes for deviceExt memory
Enter DriverEntry(FFFF840C971148F0,FFFFF8077A974DE0)
Required extension size: max: 7976928 Min: 71960
10156250 - STORMINI: Arcsas Driver entry rtnval = 0
With some prior knowledge, we know that storport will log ETW traces as well. WinDbg comes with
WMI tracing extensions that will let us collect those traces as well. Some Googling
leads
us to the Microsoft-Windows-Storage-Storport provider (w/ GUID
{c4636a1e-7986-4646-bf10-7bc3b4a76e8e}). To start collecting those events, we create a new trace
session:
kd> !wmitrace.start mylogger -kd
kd> !wmitrace.enable mylogger c4636a1e-7986-4646-bf10-7bc3b4a76e8e -level 0xFF -flag 0xFFFFFFFF
kd> !wmitrace.dynamicprint 1
Now, just let 'er rip, g⏎. And jackpot! We got something:
kd> g
[0]0004.0008::1601-01-01T00:04:56.4564911Z [Microsoft-Windows-StorPort/212v1]Dispatching an IOCTL.
[1]0004.0008::1601-01-01T00:04:56.5254670Z [Microsoft-Windows-StorPort/22v1]Initial PORT_CONFIGURATION_INFORMATION data
[1]0004.0008::1601-01-01T00:04:56.5635048Z [Microsoft-Windows-StorPort/558v2]Miniport notifies device(Port = 4294967295, Path = 255, Target = 255, Lun = 255) failed.
Corresponding Class Disk Device Guid: {00000000-0000-0000-0000-000000000000}
Adapter Guid: {2473ba50-c9a3-11ec-94f1-806e6f6e6963}
Miniport driver name: stornvme
VendorId:
ProductId:
SerialNumber:
AdapterSerialNumber:
Fault Code: 4
Fault Description: MLBAR/MUBAR is not valid
[1]0004.0008::1601-01-01T00:04:56.5849092Z [Microsoft-Windows-StorPort/23v1]Final PORT_CONFIGURATION_INFORMATION data
Looks like stornvme (the in-box Windows NVMe driver) is not happy about the BARs on the NVMe controller.
Based on the NVMe spec, MLBAR/MUBAR should correspond to BAR0/BAR1. We can take a quick look at
what they're set to since we know the Bus.Device.Function representing the NVMe controller (its hardcoded
to 0.5.0 in the TOML we gave Propolis).
We use the !pci extension to verbosely (flags |= 0x1) print the configuration space (flags |= 0x100)
of the device at 0.5.0:
kd> !pci 0x101 0 5 0

PCI Configuration Space (Segment:0000 Bus:00 Device:05 Function:00)
Common Header:
    00: VendorID       01de
    02: DeviceID       1000
    04: Command        0400 InterruptDis
    06: Status         0010 CapList
    08: RevisionID     00
    09: ProgIF         02
    0a: SubClass       08
    0b: BaseClass      01
    0c: CacheLineSize  0000
    0d: LatencyTimer   00
    0e: HeaderType     00
    0f: BIST           00
    10: BAR0           fedfe004
    14: BAR1           00000000
    18: BAR2           00000000
    1c: BAR3           00000000
    20: BAR4           80000000
    24: BAR5           00000000
    28: CBCISPtr       00000000
    2c: SubSysVenID    01de
    2e: SubSysID       1000
    30: ROMBAR         00000000
    34: CapPtr         40
    3c: IntLine        00
    3d: IntPin         00
    3e: MinGnt         00
    3f: MaxLat         00
Device Private:
    40: 03ff0011 00000004 00004004 ffffffff
    50: ffffffff ffffffff ffffffff ffffffff
    60: ffffffff ffffffff ffffffff ffffffff
    70: ffffffff ffffffff ffffffff ffffffff
    80: ffffffff ffffffff ffffffff ffffffff
    90: ffffffff ffffffff ffffffff ffffffff
    a0: ffffffff ffffffff ffffffff ffffffff
    b0: ffffffff ffffffff ffffffff ffffffff
    c0: ffffffff ffffffff ffffffff ffffffff
    d0: ffffffff ffffffff ffffffff ffffffff
    e0: ffffffff ffffffff ffffffff ffffffff
    f0: ffffffff ffffffff ffffffff ffffffff
Capabilities:
    40: CapID          11 MSI-X Capability
    41: NextPtr        00
    42: MsgCtrl        TableSize:0x3ff FuncMask:0 MSIXEnable:0
    44: MSIXTable      00000004  ( BIR:4  Offset:0x0 )
    48: PBATable       00004004  ( BIR:4  Offset:0x4000 )
As expected, that is our NVMe controller (vendor = 0x1de and device = 0x1000).
Furthermore, we have what seems like a reasonable BAR0 of fedfe004 and in fact,
the last byte being 4 means we should treat BAR0 and BAR1 as a single 64-bit
address (lower and upper 32-bits, respectively). We also have another entry at BAR4.
This all certainly tracks with how the code
is setup in Propolis. BAR0/BAR1 are used for the NVMe controller registers and
IO doorbells whereas BAR4 holds the MSI-X Table and Pending Bit Array.
Code Inspection
At this point we've enabled some tracing and gotten some hints but still not quite enough
to really figure it out. We could try searching for more traces to enable (idea: mess with
storport/stornvme's WPP tracing control block?) but let's try a different tact now.
DriverEntry
We know that stornvme is responsible for NVMe devices but since it is a miniport driver, it works
with the storport port driver to accomplish a lot of tasks. From my own experience, it is
common for the miniport driver to pass callbacks for adding and starting devices to its
port driver. To that end, let's restart the target and try to break on stornvme's entrypoint:
kd> bu stornvme!DriverEntry
kd> g
IOINIT: Built-in driver \Driver\sacdrv failed to initialize with status - 0xC0000037
We are running at normal mode.
Breakpoint 0 hit
stornvme!DriverEntry:
fffff801`24928fdc 48895c2408      mov     qword ptr [rsp+8],rbx
Great, we're at the start of the NVMe driver, let's take a peek at what it does with the uf
(Unassemble Function) command:
kd> uf stornvme!DriverEntry
fffff801`24928fdc 48895c2408      mov     qword ptr [rsp+8],rbx
fffff801`24928fe1 48897c2410      mov     qword ptr [rsp+10h],rdi
fffff801`24928fe6 55              push    rbp
fffff801`24928fe7 488d6c24a9      lea     rbp,[rsp-57h]
fffff801`24928fec 4881ecf0000000  sub     rsp,0F0h
fffff801`24928ff3 488bda          mov     rbx,rdx
fffff801`24928ff6 488bf9          mov     rdi,rcx
fffff801`24928ff9 33d2            xor     edx,edx
fffff801`24928ffb 488d4d87        lea     rcx,[rbp-79h]
fffff801`24928fff 41b8d0000000    mov     r8d,0D0h
fffff801`24929005 e8b6c4ffff      call    stornvme!memset (fffff801`249254c0)
fffff801`2492900a 814d3fb8110000  or      dword ptr [rbp+3Fh],11B8h
fffff801`24929011 488d05b8070000  lea     rax,[stornvme!NVMeHwInitialize (fffff801`249297d0)]
fffff801`24929018 4889458f        mov     qword ptr [rbp-71h],rax
fffff801`2492901c 4c8d4587        lea     r8,[rbp-79h]
fffff801`24929020 488d05e990ffff  lea     rax,[stornvme!NVMeHwStartIo (fffff801`24922110)]
fffff801`24929027 c74587d0000000  mov     dword ptr [rbp-79h],0D0h
fffff801`2492902e 48894597        mov     qword ptr [rbp-69h],rax
fffff801`24929032 4533c9          xor     r9d,r9d
fffff801`24929035 488d05f4070000  lea     rax,[stornvme!NVMeHwInterrupt (fffff801`24929830)]
fffff801`2492903c c745df02010101  mov     dword ptr [rbp-21h],1010102h
fffff801`24929043 4889459f        mov     qword ptr [rbp-61h],rax
fffff801`24929047 488bd3          mov     rdx,rbx
fffff801`2492904a 488d059f010000  lea     rax,[stornvme!NVMeHwFindAdapter (fffff801`249291f0)]
fffff801`24929051 c7458b05000000  mov     dword ptr [rbp-75h],5
fffff801`24929058 488945a7        mov     qword ptr [rbp-59h],rax
fffff801`2492905c 488bcf          mov     rcx,rdi
fffff801`2492905f 488d05fa080000  lea     rax,[stornvme!NVMeHwResetBus (fffff801`24929960)]
fffff801`24929066 c645e301        mov     byte ptr [rbp-1Dh],1
fffff801`2492906a 488945af        mov     qword ptr [rbp-51h],rax
fffff801`2492906e 488d051bbaffff  lea     rax,[stornvme!NVMeHwAdapterControl (fffff801`24924a90)]
fffff801`24929075 488945ff        mov     qword ptr [rbp-1],rax
fffff801`24929079 488d05e0a8ffff  lea     rax,[stornvme!NVMeHwBuildIo (fffff801`24923960)]
fffff801`24929080 48894507        mov     qword ptr [rbp+7],rax
fffff801`24929084 488d0535c0ffff  lea     rax,[stornvme!NVMeHwTracingEnabled (fffff801`249250c0)]
fffff801`2492908b 48894537        mov     qword ptr [rbp+37h],rax
fffff801`2492908f 488d050a090000  lea     rax,[stornvme!NVMeHwUnitControl (fffff801`249299a0)]
fffff801`24929096 4889454f        mov     qword ptr [rbp+4Fh],rax
fffff801`2492909a b802000000      mov     eax,2
fffff801`2492909f 8945d3          mov     dword ptr [rbp-2Dh],eax
fffff801`249290a2 894543          mov     dword ptr [rbp+43h],eax
fffff801`249290a5 c745c7980f0000  mov     dword ptr [rbp-39h],0F98h
fffff801`249290ac c745cfa0200000  mov     dword ptr [rbp-31h],20A0h
fffff801`249290b3 4c8b155ecf0100  mov     r10,qword ptr [stornvme!_imp_StorPortInitialize (fffff801`24946018)]
fffff801`249290ba e821a792ff      call    storport!StorPortInitialize (fffff801`242537e0)
fffff801`249290bf 4c8d9c24f0000000 lea     r11,[rsp+0F0h]
fffff801`249290c7 498b5b10        mov     rbx,qword ptr [r11+10h]
fffff801`249290cb 498b7b18        mov     rdi,qword ptr [r11+18h]
fffff801`249290cf 498be3          mov     rsp,r11
fffff801`249290d2 5d              pop     rbp
fffff801`249290d3 c3              ret
From a quick glance, we can see it's not too different from the miniport model we had in
mind. It seems to save a couple of function pointers before passing them off to the port
driver (storport!StorPortInitialize). This is further confirmed by Microsoft's own
docs.
In fact, the docs stopped me from making the (totally reasonable in my opinion) assumption
that NVMeHwInitialize would be the first callback invoked:
Later, when the PnP manager calls the port driver's
StartIoroutine, the port driver calls the miniport driver'sHwStorFindAdapterroutine with aPORT_CONFIGURATION_INFORMATION(STORPORT) structure, followed by a call to the miniport driver'sHwStorInitializeroutine to initialize the adapter.
So yea, looks like it is NVMeHwFindAdapter (HwStorFindAdapter) first and then NVMeHwInitialize
(HwStorInitialize). But that gives us our next target to break on bu stornvme!NVMeHwFindAdapter.
NVMeHwFindAdapter
We soon enough hit our breakpoint:
Breakpoint 1 hit
stornvme!NVMeHwFindAdapter:
fffff801`249291f0 48895c2410      mov     qword ptr [rsp+10h],rbx
We know the prototype of this function should look like:
ULONG HwFindAdapter(
           PVOID DeviceExtension,
  [in]     PVOID HwContext,
  [in]     PVOID BusInformation,
  [in]     PCHAR ArgumentString,
  [in/out] PPORT_CONFIGURATION_INFORMATION ConfigInfo,
  [in]     PBOOLEAN Reserved3
)
{...}
If you recall, our tracing escapades made mention of PORT_CONFIGURATION_INFORMATION so I'm interested
in what it says. The Windows x64 calling convention is RCX, RDX, R8, R9 with additional arguments
on the stack. Sadly for us we need to go trawling through the stack. We skip past the function prologue
with the p (Step) command a couple times and use kv (Display Stack Backtrace) to find it. dt (Display Type)
then lets us interpret it as the specified type.
kd> p
stornvme!NVMeHwFindAdapter+0x5:
fffff801`249291f5 4889742418      mov     qword ptr [rsp+18h],rsi
[...snip...]
kd> p
stornvme!NVMeHwFindAdapter+0x17:
fffff801`24929207 4881ec10010000  sub     rsp,110h

kd> kv
 # Child-SP          RetAddr               : Args to Child                                                           : Call Site
00 ffff808d`35e06160 fffff801`242546df     : 00000000`00000000 ffff8705`c4c7b2d8 00000000`00000003 ffff8705`c4c7c4b0 : stornvme!NVMeHwFindAdapter+0x17
                                              ^^ Reserved3 ^^   ^^ ConfigInfo ^^

kd> dt storport!_PORT_CONFIGURATION_INFORMATION ffff8705`c4c7b2d8
   +0x000 Length           : 0xe0
   +0x004 SystemIoBusNumber : 0
   +0x008 AdapterInterfaceType : 5 ( PCIBus )
   +0x00c BusInterruptLevel : 0
   +0x010 BusInterruptVector : 0xfffffffa
   +0x014 InterruptMode    : 1 ( Latched )
   +0x018 MaximumTransferLength : 0xffffffff
   +0x01c NumberOfPhysicalBreaks : 0x11
   +0x020 DmaChannel       : 0xffffffff
   +0x024 DmaPort          : 0xffffffff
   +0x028 DmaWidth         : 0 ( Width8Bits )
   +0x02c DmaSpeed         : 0 ( Compatible )
   +0x030 AlignmentMask    : 0
   +0x034 NumberOfAccessRanges : 2
   +0x038 AccessRanges     : 0xffff8705`c4ca1960 [0] _ACCESS_RANGE
   +0x040 MiniportDumpData : (null)
   +0x048 NumberOfBuses    : 0 ''
   +0x049 InitiatorBusId   : [8]  "???"
   +0x051 ScatterGather    : 0x1 ''
   +0x052 Master           : 0x1 ''
   +0x053 CachesData       : 0 ''
   +0x054 AdapterScansDown : 0 ''
   +0x055 AtdiskPrimaryClaimed : 0 ''
   +0x056 AtdiskSecondaryClaimed : 0 ''
   +0x057 Dma32BitAddresses : 0x1 ''
   +0x058 DemandMode       : 0 ''
   +0x059 MapBuffers       : 0x2 ''
   +0x05a NeedPhysicalAddresses : 0x1 ''
   +0x05b TaggedQueuing    : 0x1 ''
   +0x05c AutoRequestSense : 0x1 ''
   +0x05d MultipleRequestPerLu : 0x1 ''
   +0x05e ReceiveEvent     : 0 ''
   +0x05f RealModeInitialized : 0 ''
   +0x060 BufferAccessScsiPortControlled : 0x1 ''
   +0x061 MaximumNumberOfTargets : 0x80 ''
   +0x062 SrbType          : 0x1 ''
   +0x063 AddressType      : 0 ''
   +0x064 SlotNumber       : 5
   +0x068 BusInterruptLevel2 : 0
   +0x06c BusInterruptVector2 : 0
   +0x070 InterruptMode2   : 0 ( LevelSensitive )
   +0x074 DmaChannel2      : 0
   +0x078 DmaPort2         : 0
   +0x07c DmaWidth2        : 0 ( Width8Bits )
   +0x080 DmaSpeed2        : 0 ( Compatible )
   +0x084 DeviceExtensionSize : 0
   +0x088 SpecificLuExtensionSize : 0
   +0x08c SrbExtensionSize : 0x20a0
   +0x090 Dma64BitAddresses : 0x80 ''
   +0x091 ResetTargetSupported : 0 ''
   +0x092 MaximumNumberOfLogicalUnits : 0x8 ''
   +0x093 WmiDataProvider  : 0x1 ''
   +0x094 SynchronizationModel : 0 ( StorSynchronizeHalfDuplex )
   +0x098 HwMSInterruptRoutine : (null)
   +0x0a0 InterruptSynchronizationMode : 0 ( InterruptSupportNone )
   +0x0a8 DumpRegion       : _MEMORY_REGION
   +0x0c0 RequestedDumpBufferSize : 0
   +0x0c4 VirtualDevice    : 0 ''
   +0x0c5 DumpMode         : 0 ''
   +0x0c6 DmaAddressWidth  : 0 ''
   +0x0c8 ExtendedFlags1   : 0
   +0x0cc MaxNumberOfIO    : 0x3e8
   +0x0d0 MaxIOsPerLun     : 0xff
   +0x0d4 InitialLunQueueDepth : 0x14
   +0x0d8 BusResetHoldTime : 0x3d0900
   +0x0dc FeatureSupport   : 0
Looks like we got the right value! SystemIoBusNumber (0), SlotNumber (5) would certainly
match up with our setup.
AccessRanges sounds interesting:
Contains a physical address that specifies the bus-relative base address of a range used by the HBA.
That sounds basically like our PCI Bar and there's 2 of them as we would expect. We can use
dt to print out subfields and arrays:
kd> dt storport!_PORT_CONFIGURATION_INFORMATION -a2 AccessRanges AccessRanges. ffff8705`c4c7b2d8
   +0x038 AccessRanges  : 0xffff8705`c4ca1960
    [00] _ACCESS_RANGE
      +0x000 RangeStart    : _LARGE_INTEGER 0xfedfe000
      +0x008 RangeLength   : 0x2000
      +0x00c RangeInMemory : 0x1 ''
    [01]
      +0x000 RangeStart    : _LARGE_INTEGER 0x80000000
      +0x008 RangeLength   : 0x8000
      +0x00c RangeInMemory : 0x1 ''
A memory range starting at 0xfedfe000 that's 0x2000 bytes? Certainly sounds like our BAR0/1.
Note it doesn't have 4 in the LSB because this is the actual combined BAR0 & BAR1 address.
The BAR4 equivalent looks correct too. Ok, so all good so far. Let us keep stepping through.
We get to a call made to StorPortGetBusData which is a way for the driver to get bus-specific
information it needs while initializing. In our case, the bus is PCI. So in pseudo code we have:
_PCI_COMMON_HEADER pci_cfg[0x40] = {0}
pci_cfg_len = StorPortGetBusData(
    adapt_ext,                      // driver-specific per drive data
    PCIConfiguration,               // We're asking specifically for bus type PCI here
    port_cfg->SystemIoBusNumber,    // PCI Bus
    port_cfg->SlotNumber,           // PCI Device
    pci_cfg,                        // Output buffer for PCI configuration info
    0x40                            // Output buffer len
)
if (pci_cfg_len != 0x40)
    // goto error handling
Let's step past that and look at the return value:
stornvme!NVMeHwFindAdapter+0x16b:
fffff801`2492935b e870da92ff      call    storport!StorPortGetBusData (fffff801`24256dd0)
kd> p
stornvme!NVMeHwFindAdapter+0x170:
fffff801`24929360 488bcb          mov     rcx,rbx
kd> r eax
eax=40
Looks like it completed successfully and the returned length was as expected 0x40.
pci_cfg from the pseudo-code corresponds to rbp-0x40 so let's print the PCI config
structure we got back:
kd> dt _PCI_COMMON_HEADER @rbp-40h
storport!_PCI_COMMON_HEADER
   +0x000 VendorID         : 0x1de
   +0x002 DeviceID         : 0x1000
   +0x004 Command          : 0x406
   +0x006 Status           : 0x10
   +0x008 RevisionID       : 0 ''
   +0x009 ProgIf           : 0x2 ''
   +0x00a SubClass         : 0x8 ''
   +0x00b BaseClass        : 0x1 ''
   +0x00c CacheLineSize    : 0 ''
   +0x00d LatencyTimer     : 0 ''
   +0x00e HeaderType       : 0 ''
   +0x00f BIST             : 0 ''
   +0x010 u                : <anonymous-tag>
Looks legit, the Vendor and Device IDs match. Let's peer into the union at the end there.
Our NVMe controller is not a PCI bridge so we dig into type0 here.
kd> dt _PCI_COMMON_HEADER -a u.type0. @rbp-40h
storport!_PCI_COMMON_HEADER
   +0x010 u        :
      +0x000 type0    :
         +0x000 BaseAddresses :
          [00] 0xfedfe004
          [01] 0
          [02] 0
          [03] 0
          [04] 0x80000000
          [05] 0
         +0x018 CIS      : 0
         +0x01c SubVendorID : 0x1de
         +0x01e SubSystemID : 0x1000
         +0x020 ROMBaseAddress : 0
         +0x024 CapabilitiesPtr : 0x40 '@'
         +0x025 Reserved1 :  ""
          [00] 0 ''
          [01] 0 ''
          [02] 0 ''
         +0x028 Reserved2 : 0
         +0x02c InterruptLine : 0 ''
         +0x02d InterruptPin : 0 ''
         +0x02e MinimumGrant : 0 ''
         +0x02f MaximumLatency : 0 ''
We found our BARs again! They match exactly with what the !pci command gave us. So, still
not seeing what's wrong with them.
GetNVMeRegisterAddress
Looking forward a bit we see a promising lead, a call to GetNVMeRegisterAddress. That certainly
sounds like something that would be related to the BARs as that is how one would interact with them.
So the driver needs to be able to get a virtual mapping for those bus addresses. Let's take a peek
at what this function does:
kd> uf stornvme!GetNVMeRegisterAddress
stornvme!GetNVMeRegisterAddress:
fffff801`2493bccc 4053            push    rbx
fffff801`2493bcce 4883ec30        sub     rsp,30h
fffff801`2493bcd2 8b5a34          mov     ebx,dword ptr [rdx+34h]
fffff801`2493bcd5 33c0            xor     eax,eax
fffff801`2493bcd7 4c8bd2          mov     r10,rdx
fffff801`2493bcda 85db            test    ebx,ebx
fffff801`2493bcdc 744a            je      stornvme!GetNVMeRegisterAddress+0x5c (fffff801`2493bd28)  Branch

stornvme!GetNVMeRegisterAddress+0x12:
fffff801`2493bcde 4c8b5a38        mov     r11,qword ptr [rdx+38h]
fffff801`2493bce2 448bc8          mov     r9d,eax

stornvme!GetNVMeRegisterAddress+0x19:
fffff801`2493bce5 418bd1          mov     edx,r9d
fffff801`2493bce8 4803d2          add     rdx,rdx
fffff801`2493bceb 4d3904d3        cmp     qword ptr [r11+rdx*8],r8
fffff801`2493bcef 740a            je      stornvme!GetNVMeRegisterAddress+0x2f (fffff801`2493bcfb)  Branch

stornvme!GetNVMeRegisterAddress+0x25:
fffff801`2493bcf1 41ffc1          inc     r9d
fffff801`2493bcf4 443bcb          cmp     r9d,ebx
fffff801`2493bcf7 72ec            jb      stornvme!GetNVMeRegisterAddress+0x19 (fffff801`2493bce5)  Branch

stornvme!GetNVMeRegisterAddress+0x2d:
fffff801`2493bcf9 eb2d            jmp     stornvme!GetNVMeRegisterAddress+0x5c (fffff801`2493bd28)  Branch

stornvme!GetNVMeRegisterAddress+0x2f:
fffff801`2493bcfb 413844d30c      cmp     byte ptr [r11+rdx*8+0Ch],al
fffff801`2493bd00 4d8b0cd3        mov     r9,qword ptr [r11+rdx*8]
fffff801`2493bd04 458b4204        mov     r8d,dword ptr [r10+4]
fffff801`2493bd08 0f94c0          sete    al
fffff801`2493bd0b 88442428        mov     byte ptr [rsp+28h],al
fffff801`2493bd0f 418b44d308      mov     eax,dword ptr [r11+rdx*8+8]
fffff801`2493bd14 418b5208        mov     edx,dword ptr [r10+8]
fffff801`2493bd18 89442420        mov     dword ptr [rsp+20h],eax
fffff801`2493bd1c 4c8b1565a30000  mov     r10,qword ptr [stornvme!_imp_StorPortGetDeviceBase (fffff801`24946088)]
fffff801`2493bd23 e8e8b091ff      call    storport!StorPortGetDeviceBase (fffff801`24256e10)

stornvme!GetNVMeRegisterAddress+0x5c:
fffff801`2493bd28 4883c430        add     rsp,30h
fffff801`2493bd2c 5b              pop     rbx
fffff801`2493bd2d c3              ret
A fairly short function, there's enough context to get it pretty readable in pseudo-code:
PVOID GetNVMeRegisterAddress(adapt_ext, port_cfg, addr) {
    num_ranges = port_cfg->NumberOfAccessRanges;
    if (num_ranges == 0)
        return NULL

    ranges = port_cfg->AccessRanges
    for (i = 0; i < num_ranges; i++)
        if (ranges[i] == addr) {
            range_in_io_space = !ranges[i].RangeInMemory
            range_start = ranges[i].RangeStart
            bus_num = port_cfg->SystemIoBusNumber
            range_len = ranges[i].RangeLength
            bus_type = port_cfg->AdapterInterfaceType
            return StorPortGetDeviceBase(adapt_ext, bus_type, bus_num, range_start, range_len, range_in_io_space)
        }
    }
    return NULL
}
It does exactly as expected: map a bus address into kernel virtual memory (system space) but with some checks against the memory ranges popoulated in the port configuration struct.
So let's see what happens after running this. Stepping forward to that call (the pct command is
great for stepping until the next call or ret instruction):
kd> pct
stornvme!NVMeHwFindAdapter+0x1d1:
fffff801`249293c1 e806290100      call    stornvme!GetNVMeRegisterAddress (fffff801`2493bccc)
kd> p; r rax
rax=0000000000000000
Oh no, it returned NULL 🥲. On the bright side I guess we found the problem.
The driver falls off the happy path here and begins notifying the port driver about the error. We also end up finding where the trace message we saw earlier originated from:
kd> pct
stornvme!NVMeHwFindAdapter+0x243:
fffff801`24929433 e8b83d90ff      call    storport!StorPortNotification (fffff801`2422d1f0)
kd> du @rax
fffff801`2493ee00  "MLBAR/MUBAR is not valid"
This causes NVMeHwFindAdapter to return SP_RETURN_BAD_CONFIG (3) which will eventually get
bubbled up as STATUS_DEVICE_CONFIGURATION_ERROR (0xC0000182).
So what went wrong? GetNVMeRegisterAddress just looks to see if the given address matches
any of the regions in the port config. So that means none of them matched? Let's look at the
calling code to get a better idea:
NVMeHwFindAdapter() {
    // ...snip...

    // Earlier pci_cfg lookup we saw
    if (StorPortGetBusData(...) != 0x40)
        goto err_notification_path

    *(adapt_ext + 4) = pci_cfg->VendorID
    *(adapt_ext + 6) = pci_cfg->DeviceID
    *(adapt_ext + 8) = pci_cfg->RevisionID

    if (IsIntelChatham(adapt_ext)) {
        mlbar = pci_cfg->u.type0.BarAddresses[2]
        mubar = pci_cfg->u.type0.BarAddresses[3]
        mask = 0x0FFFFF000
    } else {
        mlbar = pci_cfg->u.type0.BarAddresses[0]
        mubar = pci_cfg->u.type0.BarAddresses[1]
        mask = 0xFFFFC000
    }

    addr = (mubar << 32) | (mlbar & mask)
    *(adapt_ext + 0x90) = addr
    p_addr = GetNVMeRegisterAddress(adapt_ext, port_cfg, addr)
    if (p_addr == NULL)
        goto slighty_diff_err_notification_path

    // ...snip...
}
First off the bat we have some sort of non-standard behaviour if the device matches whatever
an Intel Chatham is: we use different BARs than standard. Google says Chatham was a prototype
NVMe device so I suppose it makes sense it might've predated the current spec-mandated BAR
choices. I guess it makes sense why they consider the RevisionID as well then.
In any case, we clearly aren't an Intel Chatham device so we fall into the other arm of the
conditional. We grab BAR0 and BAR1, combine them to form the 64-bit physical address
but inexplicably seem to mask off the bottom 14 bits?
Recall, BAR0 was 0xFEDFE004, which means the final address that gets passed to
GetNVMeRegisterAddress is 0xFEDFC000. No wonder it fails.
PCI BARs
Ok, so we've found what looks to be the problem. But let's back up a bit first. What is a BAR to
begin with? This is based on my own rudimentary understanding but a Base Address Register
entry is how the software on your machine can interact with PCI devices connected to it. The BIOS/firmware
or OS will assign addresses for every valid BAR on each PCI device. So, when a driver or what have you
attempts to read or write a certain address, the corresponding PCI device will recognize such an access
and service it appropriately. Note, this is papering over Port I/O vs Memory I/O and mostly assuming
the latter.
BAR Size
Looking through the PCI configuration space, one will notice there's no mention of the size of the region described by a particular BAR. Instead, it's done with a pretty cool trick. To figure out the size the steps are:
- Read and save the current BAR value.
- Write a new BAR value of all 1s set.
- Read back the BAR, the least significant bit set (ignoring lower 4 bits) gives you the region size.
- Restore the old value.
A worked example using the BAR we saw for the propolis NVMe controller is:
- read(
BAR0) =0xFEDFE004 - write(
BAR0,0xFFFFFFFF) - read(
BAR0) =0xFFFFE004= (ignoring lower 4 bits) => LSB = bit 13 => size =0x2000 - write(
BAR0,0xFEDFE000)
This is exactly what Propolis does.
BARs on Boot
One question I had was is it the firmware assigning these BARs or Windows itself? If the former, then why does QEMU not trip over this as we used the same OVMF blob in both cases. To answer that, WinDbg can at least tell us what the BARs were at boot.
But first, we can use the !arbiter extension to see if there's any clashes or such going on:
kd> !arbiter 2
DEVNODE ffff8705c4572a20 (HTREE\ROOT\0)
  Memory Arbiter "RootMemory" at fffff80122845780
    Allocated ranges:
      0000000000000000 - 0000000000000fff       00000000 <Not on bus>
      00000000000a0000 - 00000000000bffff S     ffff8705c449f8f0  (pci)
      0000000080000000 - 00000000feefffff
        0000000080000000 - 00000000feefffff SC    ffff8705c449f8f0  (pci)
        00000000fec00000 - 00000000fec003ff  CB   ffff8705c45dbda0
        00000000fee00000 - 00000000fee003ff  CB   ffff8705c45dbda0
      0001000000000000 - ffffffffffffffff       00000000 <Not on bus>
    Possible allocation:
      < none >

      DEVNODE ffff8705c44c9ca0 (ACPI\PNP0A03\0)
        Memory Arbiter "PCI Memory (b=0)" at ffff8705c4c52610
          Allocated ranges:
            0000000000000000 - 000000000009ffff       00000000 <Not on bus>
            00000000000c0000 - 000000007fffffff       00000000 <Not on bus>
            0000000080000000 - 0000000080007fff       ffff8705c4c5c360  (stornvme)
            00000000fec00000 - 00000000fec00fff   BA  ffff8705c4c19a70
            00000000fedfe000 - 00000000fedfffff       ffff8705c4c5c360  (stornvme)
            00000000fee00000 - 00000000feefffff   BA  ffff8705c4c19a70
            00000000fef00000 - ffffffffffffffff
              00000000fef00000 - ffffffffffffffff  C    00000000 <Not on bus>
              0001000000000000 - ffffffffffffffff  C    00000000 <Not on bus>
          Possible allocation:
            < none >
We pass (2) to specifically look at memory arbiters. Ok, while there do seem to be some
conflicts going on (see the lines with C in the third column), none are with the BARs
on our NVMe. Curiously though, we don't see B (Boot Allocated) for either of the ranges
on the NVMe. Helpfully, it includes the address of the PDO (Physical Device Object) created
by the PCI bus driver for the device. That with the !devobj extension gives us the Device
Node. Once we have the Device Node address we can use !devnode <addr> 0x2 to get the
resources allocated to the device.
kd> !devobj ffff8705c4c5c360
Device object (ffff8705c4c5c360) is for:
 NTPNP_PCI0003 \Driver\pci DriverObject ffff8705c452ace0
Current Irp 00000000 RefCount 0 Type 00000004 Flags 00001040
SecurityDescriptor ffffe3819b9f8c60 DevExt ffff8705c4c5c4b0 DevObjExt ffff8705c4c5cbd8 DevNode ffff8705c4c5cca0
ExtensionFlags (0x00000010)  DOE_START_PENDING                                                 ^^^^^^^^^^^^^^^^
Characteristics (0x00000100)  FILE_DEVICE_SECURE_OPEN
AttachedDevice (Upper) ffff8705c4c7b050 \Driver\stornvme
Device queue is not busy.

kd> !devnode ffff8705c4c5cca0 0x2
DevNode 0xffff8705c4c5cca0 for PDO 0xffff8705c4c5c360
  Parent 0xffff8705c44c9ca0   Sibling 0xffff8705c4c5eca0   Child 0000000000
  InstancePath is "PCI\VEN_01DE&DEV_1000&SUBSYS_100001DE&REV_00\3&267a616a&0&28"
  ServiceName is "stornvme"
  State = DeviceNodeStartPending (0x305)
  Previous State = DeviceNodeResourcesAssigned (0x304)
  StateHistory[03] = DeviceNodeResourcesAssigned (0x304)
  StateHistory[02] = DeviceNodeDriversAdded (0x303)
  StateHistory[01] = DeviceNodeInitialized (0x302)
  StateHistory[00] = DeviceNodeUninitialized (0x301)
  StateHistory[19] = Unknown State (0x0)
  StateHistory[18] = Unknown State (0x0)
  StateHistory[17] = Unknown State (0x0)
  StateHistory[16] = Unknown State (0x0)
  StateHistory[15] = Unknown State (0x0)
  StateHistory[14] = Unknown State (0x0)
  StateHistory[13] = Unknown State (0x0)
  StateHistory[12] = Unknown State (0x0)
  StateHistory[11] = Unknown State (0x0)
  StateHistory[10] = Unknown State (0x0)
  StateHistory[09] = Unknown State (0x0)
  StateHistory[08] = Unknown State (0x0)
  StateHistory[07] = Unknown State (0x0)
  StateHistory[06] = Unknown State (0x0)
  StateHistory[05] = Unknown State (0x0)
  StateHistory[04] = Unknown State (0x0)
  Flags (0x6c0000f0)  DNF_ENUMERATED, DNF_IDS_QUERIED,
                      DNF_HAS_BOOT_CONFIG, DNF_BOOT_CONFIG_RESERVED,
                      DNF_NO_LOWER_DEVICE_FILTERS, DNF_NO_LOWER_CLASS_FILTERS,
                      DNF_NO_UPPER_DEVICE_FILTERS, DNF_NO_UPPER_CLASS_FILTERS
  CapabilityFlags (0x00400000)
                                Unknown flags 0x00400000
  CmResourceList at 0xffffe3819bc0b640  Version 1.1  Interface 0x5  Bus #0
    Entry 0 - Memory (0x3) Device Exclusive (0x1)
      Flags (
      Range starts at 0x00000000fedfe000 for 0x2000 bytes
    Entry 1 - DevicePrivate (0x81) Device Exclusive (0x1)
      Flags (
      Data - {0x00000001, 0000000000, 0000000000}
    Entry 2 - Memory (0x3) Device Exclusive (0x1)
      Flags (
      Range starts at 0x0000000080000000 for 0x8000 bytes
    Entry 3 - DevicePrivate (0x81) Device Exclusive (0x1)
      Flags (
      Data - {0x00000001, 0x00000004, 0000000000}
    Entry 4 - Interrupt (0x2) Device Exclusive (0x1)
      Flags (LATCHED MESSAGE
      Message Count 1, Vector 0xfffffffe, Group 0, Affinity 0x1
    Entry 5 - Interrupt (0x2) Device Exclusive (0x1)
      Flags (LATCHED MESSAGE
      Message Count 1, Vector 0xfffffffd, Group 0, Affinity 0x2
    Entry 6 - Interrupt (0x2) Device Exclusive (0x1)
      Flags (LATCHED MESSAGE
      Message Count 1, Vector 0xfffffffc, Group 0, Affinity 0x4
    Entry 7 - Interrupt (0x2) Device Exclusive (0x1)
      Flags (LATCHED MESSAGE
      Message Count 1, Vector 0xfffffffb, Group 0, Affinity 0x8
    Entry 8 - Interrupt (0x2) Device Exclusive (0x1)
      Flags (LATCHED MESSAGE
      Message Count 1, Vector 0xfffffffa, Group 0, Affinity 0x1

  BootResourcesList at 0xffffe3819b92aec0  Version 1.1  Interface 0x5  Bus #0
    Entry 0 - Memory (0x3) Device Exclusive (0x1)
      Flags (
      Range starts at 0x0000000800000000 for 0x2000 bytes
    Entry 1 - Memory (0x3) Device Exclusive (0x1)
      Flags (
      Range starts at 0x0000000080000000 for 0x8000 bytes
Ok, Entry 0 and Entry 2 clearly correspond to our BARs but take a look at the entries
under BootResourcesList. We have 2 regions, Entry 1 there is clearly our BAR4 which
matches Entry 2 in CmResourceList. That means boot Entry 0 would be our BAR0/BAR1
which was apparantly mapped at 0x0000000800000000 by the firmware but seems like
Windows had a different idea about where it should go.
AFAIK, Windows may remap things but it still has to do so within the confines of the ranges
assigned to the root PCI bus. I guess that tracks as it doesn't even seem to be in the list of
allocated regions !arbiter told us about.
NVMe BARs
Taking a look at the issue from another perspective, is this behaviour spec mandated?. Breaking out the NVMe spec (1.0e which is what Propolis mostly implements), we find:
| Bits | Type | Reset | Description |
|---|---|---|---|
| 31:14 | RW | 0h | Base Address (BA): Base address of register memory space. For controllers that support a larger number of doorbell registers or have vendor specific space following the doorbell registers, more bits are allowed to be RO such that more memory space is consumed. |
| 13:04 | RO | 0h | Reserved |
I guess Propolis is technically afoul of the spec then. Well, at least I know who to blame. 😅

Solution
Is it truly that easy? Do we just need to double our reported BAR size? Everything leading up to this seems to imply so. Let's give it a try:
diff --git a/propolis/src/hw/nvme/mod.rs b/propolis/src/hw/nvme/mod.rs
index 59469fc..1fbca34 100644
--- a/propolis/src/hw/nvme/mod.rs
+++ b/propolis/src/hw/nvme/mod.rs
@@ -976,7 +976,7 @@ enum CtrlrReg {
 }

 /// Size of the Controller Register space
-const CONTROLLER_REG_SZ: usize = 0x2000;
+const CONTROLLER_REG_SZ: usize = 0x4000;

 lazy_static! {
     static ref CONTROLLER_REGS: (RegMap<CtrlrReg>, usize) = {
@@ -1005,7 +1005,7 @@ lazy_static! {
         // Pad out to the next power of two
         let regs_sz = layout.iter().map(|(_, sz)| sz).sum::<usize>();
         assert!(regs_sz.next_power_of_two() <= CONTROLLER_REG_SZ);
-        layout.last_mut().unwrap().1 = regs_sz.next_power_of_two() - regs_sz;
+        layout.last_mut().unwrap().1 = CONTROLLER_REG_SZ - regs_sz;

         // Find the offset of IOQueueDoorBells
         let db_offset = layout
A quick detour through cargo build --release and we're ready to get things going!
We're just gonna jump straight to the meat of it and set a breakpoint at GetNVMeRegisterAddress.
But before we go to it, let's take a peek at our BARs:
kd> !pci 1 0 5 0
PCI Segment 0 Bus 0
05:0  01de:1000.00  Cmd[0406:.mb...]  Sts[0010:c....]  Class:1:8:2  SubID:01de:1000
      cf8:80002800  IntPin:0  IntLine:0  Rom:0  cis:0  cap:40
      MEM[0]:fedfc004  MEM[4]:80000000
That's promising, our BAR now reads fedfc004 instead of fedfe004.
Ok, let's see if stornvme is happy this time.
kd> g
Breakpoint 0 hit
stornvme!GetNVMeRegisterAddress:
fffff801`7b33bccc 4053            push    rbx
kd> gu
stornvme!NVMeHwFindAdapter+0x1d6:
fffff801`7b3293c6 48898398000000  mov     qword ptr [rbx+98h],rax
kd> r @rax
rax=ffffc781fbb60000
🎉! No more NULL pointer! And since rax here is a kernel virtual address mapped to our
NVMe controller registers, we should be able to read the version field (@ offset 8) from it:
kd> dd @rax+8 L1
ffffc781`fbb60008  00010000
00010000 is exactly what Propolis gives us which is
NVME_VER_1_0 = 0x10000.
Ok, but to be 100% sure, NVMeHwFindAdapter should no longer return SP_RETURN_BAD_CONFIG (3) but
SP_RETURN_FOUND (1):
kd> gu
storport!RaCallMiniportFindAdapter+0x193:
fffff801`7ac546df 8bf0            mov     esi,eax
kd> r rax
rax=0000000000000001
Woo! 🛳 it! If we let it go on its merry way now it just boots up fine. We're even able to RDP in (albeit it drops sporadically):
EDIT: My colleague dug in and figured out the reason for the RDP instability [details].
Why does QEMU work?
Propolis is not alone in this. QEMU was actually susceptible to this bug as well at one
point. In fact the version (QEMU emulator version 4.2.1 (Debian 1:4.2-3ubuntu6.21)) I
was testing with is buggy in the same way. I just happened to get lucky about where the
BARs got placed. After creating another test VM with a bunch of emulated NVMe devices
attached I immediately ran into the issue (the NVMe devices that landed with unlucky
BAR allotments failed to initialize in the same way as Propolis).
Up until QEMU v6.0 (so just last year!), the NVMe device it emulated exposed a BAR0/BAR1
of size 0x2000 just like us. If you search, you'll find strangely reminiscent bugs
like this:
Only one NVMe device is usable in Windows (10) guest.
Reading the bug reveals device manager complaining:
The I/O device is configured incorrectly or the configuration parameters to the driver are incorrect.
I wonder where we've heard that 🤔. That's just the corresponding text for
STATUS_DEVICE_CONFIGURATION_ERROR.
Then, how did QEMU v6.0 fix it? Well, as far as I can tell: accidentally? The
change that
effectively bumped up the size was about free'ing up BAR4 by just moving the MSI-X Table
over to BAR0/1.
Why does Linux work?
(EDIT: Added this section.)
Up until this point we've been testing Propolis primarily with Linux and never ran into
this issue. What gives? Well, Linux is not as stringent
as Windows about the size of BAR0 initially: it only asks for a modest 0x2000 bytes
to begin with and that's exactly what Propolis provided.
Note that this doesn't mean Linux doesn't support NVMe controllers that need more space (say due to larger strides between each I/O queue doorbell register). It will attempt to remap the BAR before initializing each queue to make sure everything is within bounds.
Conclusion
It's a wonder things work sometimes.
EDIT: Fix landed in Propolis.
Thanks to Jon for helping proofread.